How To Make Cut Out Cards - Santa Clause Crafts for Kids : Make your own Christmas ... - Open the design space project and cut the design with your cricut machine.
Dapatkan link
Facebook
X
Pinterest
Email
Aplikasi Lainnya
How To Make Cut Out Cards - Santa Clause Crafts for Kids : Make your own Christmas ... - Open the design space project and cut the design with your cricut machine.. You'll want to attach them using a dot of glue or a glue stick. In this tutorial, you'll learn how to make simple and elegant paper cut greeting cards. Fold it over and you have a card. How to cut layers for card making. Make sure only to use a white polymer eraser.
Use the template to trim the flowers and other teapot details from coloured card and patterned paper. This will give you the perfect size for printable flashcards. Create the base card take the 5×7 inch rectangle which you cut from the first page of the pdf and fold it down the central score line to create the base of your handmade card. Tabs can be wide or narrow depending on what kind of art you choose. Remember to leave the fold intact.
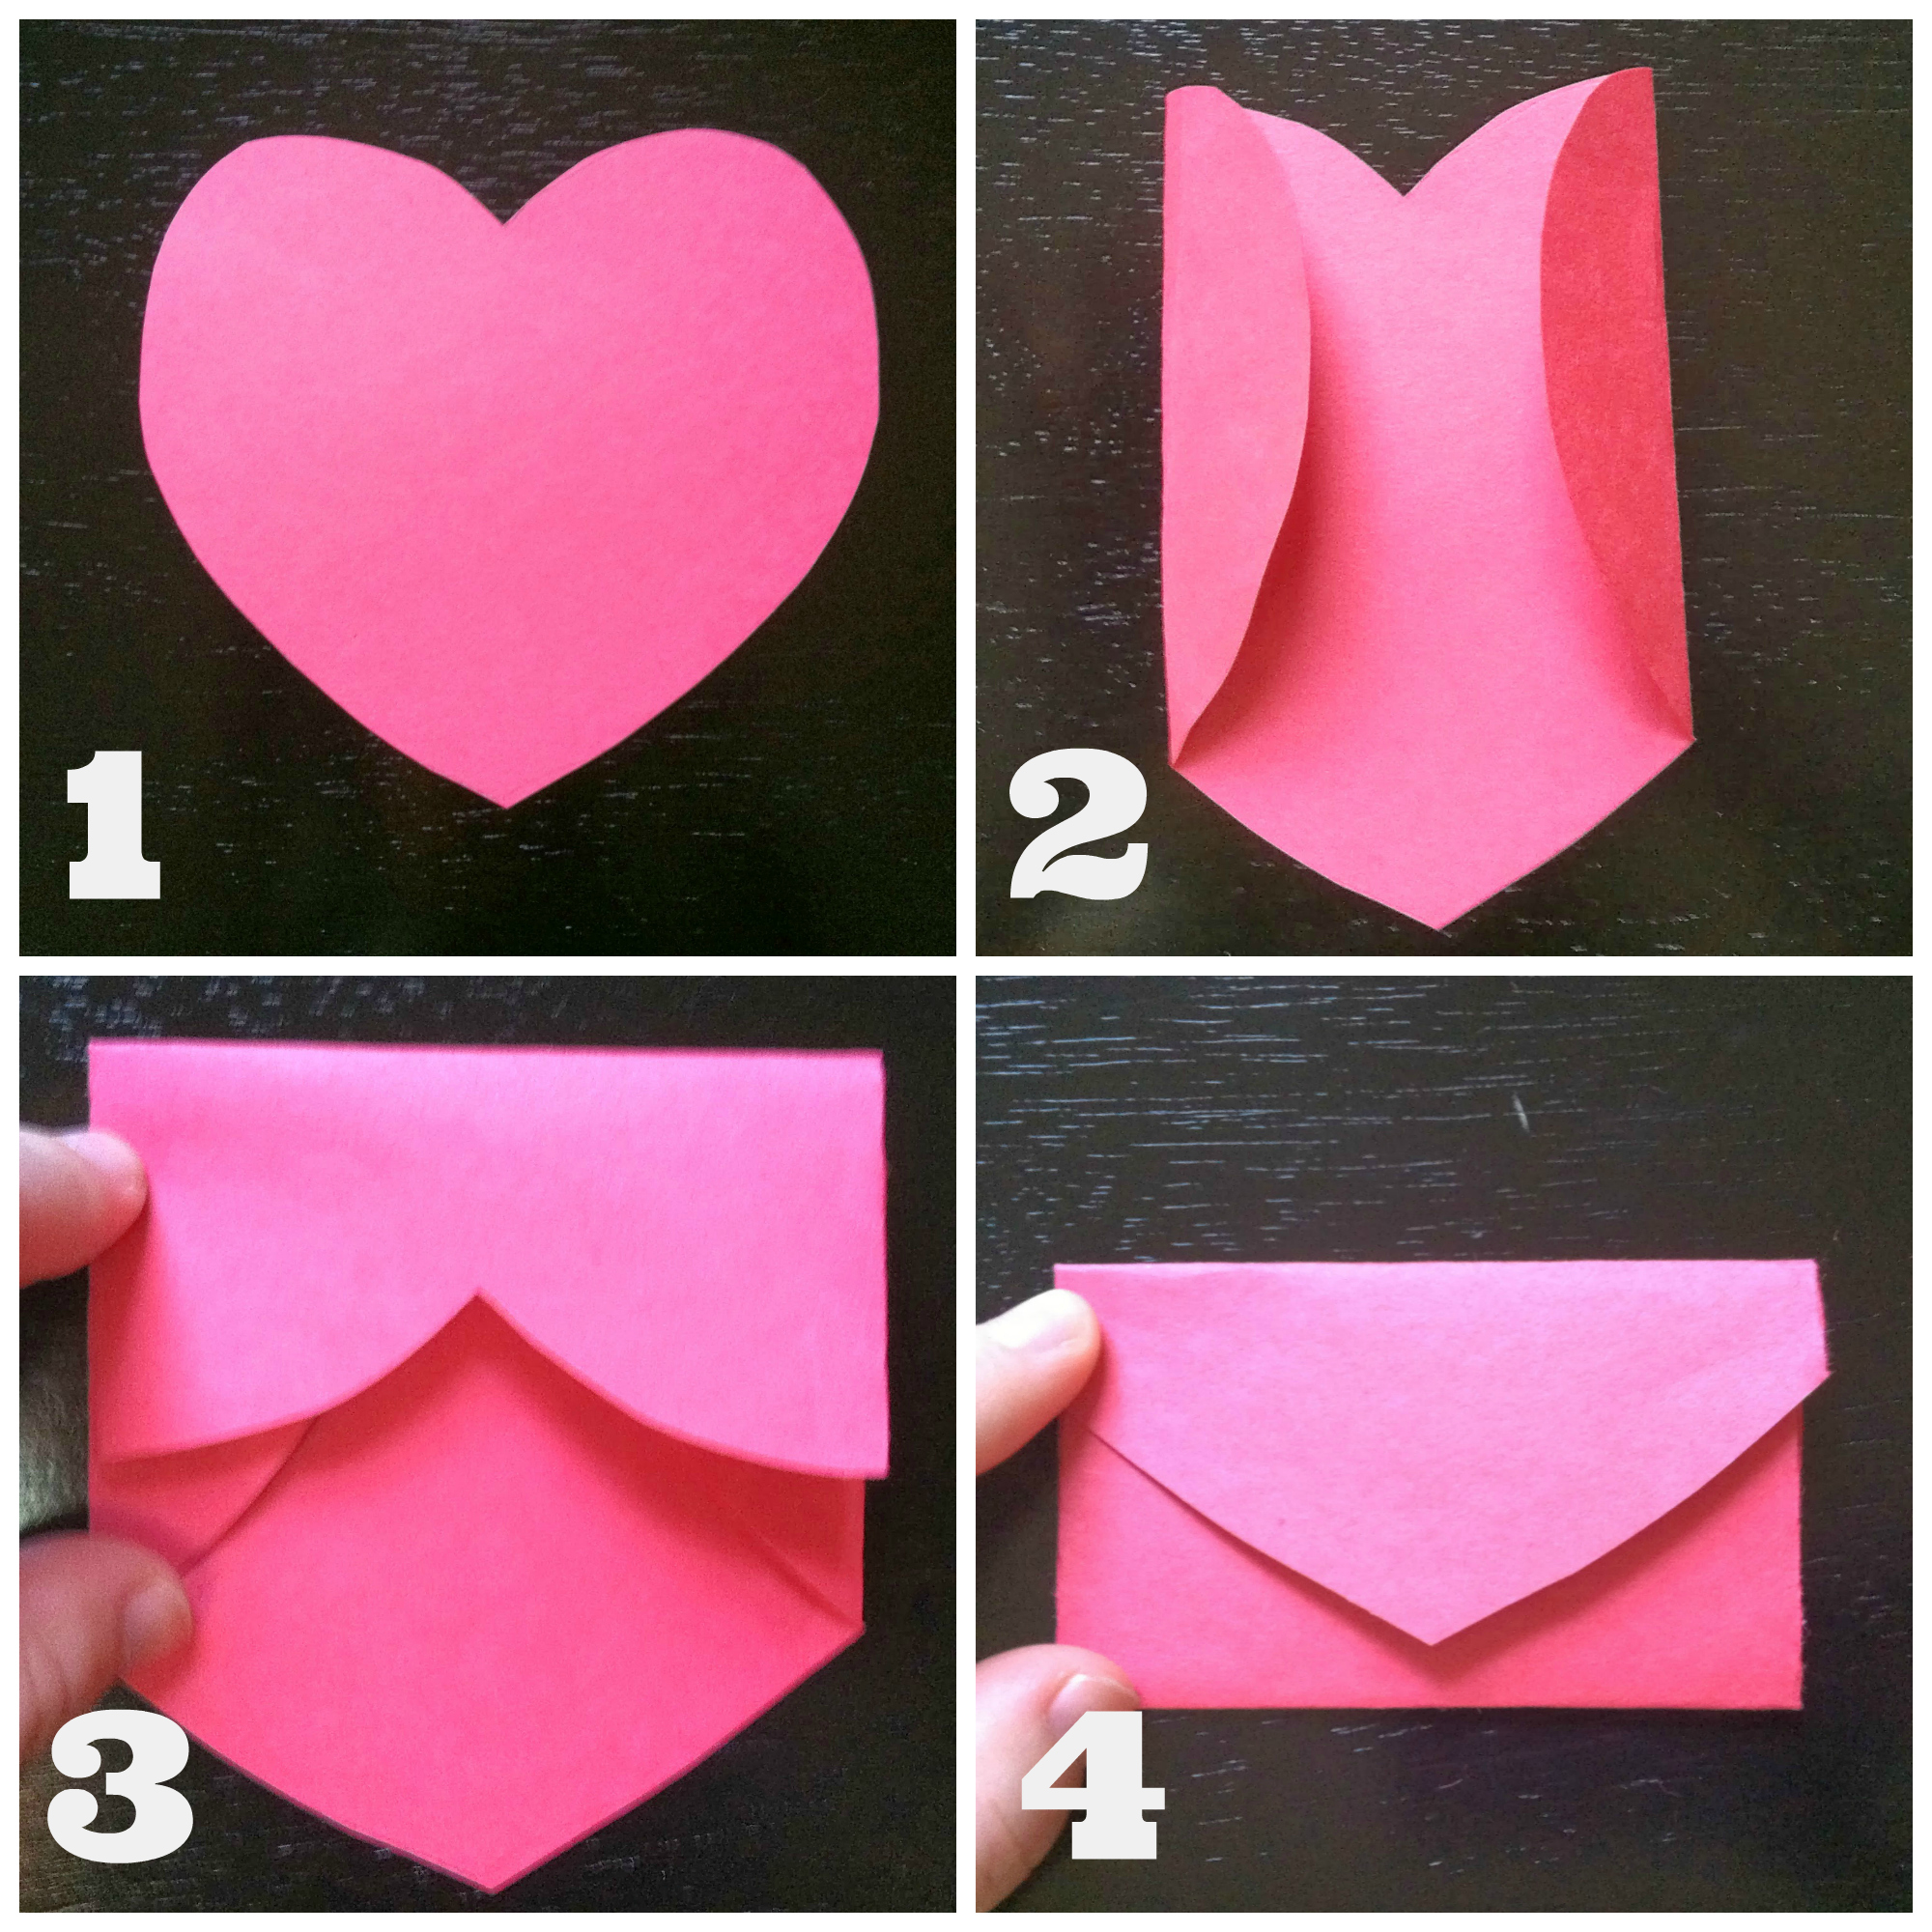
DIY Heart Envelope Card - Mommysavers from mommysavers.com Once you hit go on the software/app, cricut joy will cut out the card design! After adhering your embellishments, the pencil marks need to be erased. The words will be cut out of the card. Just use your imagination and a simple art knife :)let's begin! Slim line window card cutting dimensions. Cut and score all lines where shown in the template. The paper between each of the cuts will form a tab that you'll secure your pop up art to. You'll want to attach them using a dot of glue or a glue stick.
Then select both the text and the card shape and use the slice function.
The popsicles are all the same, but there's one for a teacher, one for a coach and one that can be given to anybody. How to cut layers for card making. This will give you the perfect size for printable flashcards. If you accidentally cut your sim card to the wrong size, you can use a sim card adapter tray to change it back to the right size! Pro tip in the template, the rainbow rays are complete circles. Include silhouette in your search). Align your selected die so part of the die extends over the folded edge of the card, and will not cut through the card. This will ensure your design ends up perfectly centered! Then select both the text and the card shape and use the slice function. Making a cut out card! I'll be on the lookout for 2013's for next year! Fold it over and you have a card. In today's tuesday tip, let's talk about how to measure your cardstock for layering.
Just use your imagination and a simple art knife :)let's begin! The words will be cut out of the card. Drag in vector artwork that you want on your card. When laying out cut paper shapes onto a card people will often use a pencil to make light marks as a placement guide. Pro tip in the template, the rainbow rays are complete circles.
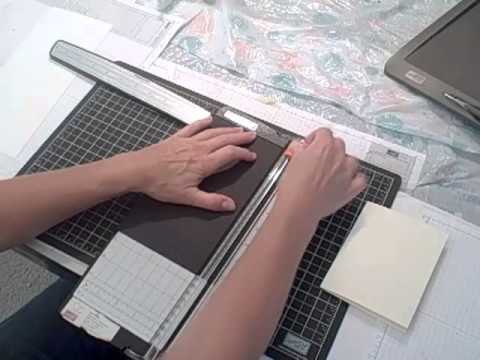
How to cut cardstock to make cards and layers - YouTube from i.ytimg.com The sim card adapter kit includes. Align your selected die so part of the die extends over the folded edge of the card, and will not cut through the card. I hope you liked the video and ideas :)follo… After adhering your embellishments, the pencil marks need to be erased. #greetingcards #handmadecards #lisasstampstudiohave you ever wondered how to make cut out shapes on a greeting card layer? Pink erasers and worse yet pencil erasers will leave dark spots and smudges on your card. Once your illustrations are colored and cut out it's time to attach them to the tabs on your pop up cards. Also, remember you can go to the design tab and add a theme, colors.
After adhering your embellishments, the pencil marks need to be erased.
How to make greeting cards | paper cutting art : For this card in particular i just wanted to cut out some hearts; Open the design space project and cut the design with your cricut machine. Click the green make it button on the top right of your screen. If you've completed the above steps correctly then the main card base (black layer) will appear with a score and cut line as shown below. The sim card adapter kit includes. In layout > size, select 4x 6 size. Repeat that for each line of text and any images, like the cake in my design pictured above. A perfectly sized sim card will pop out. In this tutorial, you'll learn how to make simple and elegant paper cut greeting cards. Keep in mind that not the entire illustration will make contact with the pop up tab. I'll be on the lookout for 2013's for next year! This is the last one of the free cricut card projects which comes with a free svg cut file and tips on cutting intricate cuts with your cricut.
#greetingcards #handmadecards #lisasstampstudiohave you ever wondered how to make cut out shapes on a greeting card layer? Art with simpler outlines, such as silhouetted objects, are easier to cut by hand. Just use your imagination and a simple art knife :)let's begin! Remember to leave the fold intact. There's no need for a laser cutting machine either!
How to Make the Platonic Solids Out of Playing Cards ... from img.wonderhowto.com This card might look like it takes a bit longer to make, but we've got templates for that — just print 'em out, trace the images onto card stock, cut the pieces and glue it all together. Design a birthday card for someone with a large letter initial. #greetingcards #handmadecards #lisasstampstudiohave you ever wondered how to make cut out shapes on a greeting card layer? This will ensure your design ends up perfectly centered! The coloured layers show the other parts of card and they will be cut on different mats. The words will be cut out of the card. Open the design space project and cut the design with your cricut machine. With the card on the card mat, load it into cricut joy by feeding it directly under the rollers.
Repeat that for each line of text and any images, like the cake in my design pictured above.
With the card on the card mat, load it into cricut joy by feeding it directly under the rollers. Remember to leave the fold intact. I have a free download for you to. The coloured layers show the other parts of card and they will be cut on different mats. The paper between each of the cuts will form a tab that you'll secure your pop up art to. You'll want to attach them using a dot of glue or a glue stick. This will allow part of the fold of the card to remain, so when the card is opened it will still be intact. We will cover what sizes to cut cardstock for mats and layers for your cards. This is the last one of the free cricut card projects which comes with a free svg cut file and tips on cutting intricate cuts with your cricut. If you've completed the above steps correctly then the main card base (black layer) will appear with a score and cut line as shown below. There's no need for a laser cutting machine either! Select the material type (cardstock), pressure (default), load your mat into your cricut, and push the flashing go button to begin cutting. Cut 2 @ 3 1/4″ x 8 1/2″ (one for the card base and one for the inside flap) cardstock (inside):
Make The Card / How To Make A Beautiful Handmade Card In Ten Minutes - What company do i use to make my playing cards? . .or you want to make new cards with a reverse side, just choose the basic (and reversed card) no, you don't need to remake your cards. Make your own personalized business card today with our free business card maker. Magic card creator, magic card creater, magic card generator, generator, magic, characters of mtg card maker is not affiliated with, endorsed, sponsored, or specifically approved by wizards of the. The gathering players to easily create and share custom cards and concepts. Card — the term card (from greek χάρτης chartēs , paper, papyrus ), primarily refers to cardboard or a piece of this.more generally, the term can refer to any of various small flat objects, typically made from. Keep chaining them to add more than 1 token. This section appears on your right only if the image and the name of your card monster has been changed. .or ...
How To Deal With A Moody Cancer Woman : Interesting facts about Cancer Zodiac - 21FACTS.NET - Share your feelings with her. . How to attract a cancer woman. As a life partner because she knows the rules of interesting with a lot of layers to her charismatic personality, the cancerian woman does have some dominating traits. Treat her siblings with respect. But books, magazines, movies, or puzzles may be welcome distractions during chemotherapy. Cancers have a need unlike any other sign to externalize their feelings—if you just acknowledge them, it helps to diffuse their moods. When you are diagnosed with cancer, it can be difficult to identify and honor your feelings. These girls tend to be moody and unpredictably emotional at times. When visiting a friend with cancer, one of the most meaningful things you can do is simply listen, say social workers at msk. As one of the most emotional moon signs, learn how to deal with the sensitivity a cancer moon sign brings. There...
Sayangnya, identitas wanita tersebut tidak disebutkan, meski fotonya … Beruntung, putri kartika putri itu tak lagi merasakan sakit meski mengalami insiden kecelakaan tersebut. Budi arista romadhoni selasa, 16 november 2021 | 14:03 wib. Golongan darah rhnull hanya dapat ditemukan pada 43 orang di seluruh dunia, termasuk wanita tersebut. Wanita beli makanan pakai jasa ekspedisi, saat paket dibuka naik darah: Tarif Balai Laboratorium Kesehatan Dan Kalibrasi Yogyakarta from labkes.jogjaprov.go.id Vor 1 tag · cek fakta infografis jakarta bogor bekaci jabar jogja jateng malang jatim bali lampung regional lainnya banten. Untuk jadwal pelaksanaan skb casn pemprov sumatera selatan atau sumsel, dapat dilihat di sini. Ilustrasi tes gula darah (foto: Golongan darah rhnull hanya dapat ditemukan pada 43 orang di seluruh dunia, termasuk wanita tersebut. ...


Komentar
Posting Komentar